Sunday, October 24, 2010

The world sighs

and waits for winter in swirling of autumn leaves.
Autumn in the herb garden
"Indeed, none of those who wait for You will be ashamed."
Psalm 25:3

"Wait for the LORD; Be strong and let your heart take courage;
Yes, wait for the LORD."
Psalm 27:14

"Rest in the LORD and wait patiently for Him"
Psalm 37:7

"And now, Lord, for what do I wait? My hope is in You."
Psalm 39:7

Resting and waiting here... patient, for the most part,


Saturday, October 23, 2010

Where it all began

This is where it all began... The Little House in the Big Woods.
One of my fondest childhood memories is of the evenings that my parents spent reading books aloud to my brother and I.  I'm sure that many books were opened during those family times but the most influential for me would have been the "Little House" series written by Laura Ingalls Wilder.

Certainly I have read books that have influenced me spiritually in greater ways, but no book series has played a bigger role in encouraging me to live in a pioneering, adventurous, family-centered, creative way.  

Poor Joyfuldadofmany, I don't think when he married me that he had any idea that I was determined to live out my childhood pioneer fantasy, even if we were required to live within the city limits by his job as a policeman.
Last night I realized that I had not read the "Little House" series to our youngest six boys.  I think that I had mistakenly thought that they might not be interested.  I was so wrong.

Let me tell you; there isn't an activity much sweeter than snuggling on the couch with a brevy of boys to read.  "Please Mother, just one more chapter, please?"

What books influenced you from your childhood?  I'd love to hear from you....


Friday, October 22, 2010

I can't be held responsible....

for anything I write here while on pain medication....

Dear Mr. Fly,

Why do you insist on landing on my new iMac and leaving little "gifts" for me there?
Don't worry, I'm still a good shot with the 'ol fly swatter, even on crutches!

Now I just need a little window cleaner for my 'puter and everything will be fine.... just fine....

I am doing fine here... just "redirecting my energies," as Susan so aptly put in in the comments on a recent post.  Yes, I like that... I'm not lazy, just "redirecting my energy."  : )  Seriously. 

Thursday, October 21, 2010

Easiest Denim Quilt Instructions- part 2

Ready for part two of the easiest denim quilt ever?  If you haven't read it yet, here's part one.

You will love these quilts... They are frugal (save those worn out jeans), warm and aesthetically pleasing too.  I am including instructions for both twin and crib sized quilts.


**note: as far a colors go... the colors listed below are just a suggestion.  I have also used white denim, and even dark green, black and khaki as well.... pretty much whatever I have on hand.  The splash of unexpected color can be refreshing in a sea of blue pieces!

Cutting list: Twin sized denim quilt
24 light blue 6 1/4" squares
23 medium blue 6 1/4" squares
23 dark blue 6 1/4" squares
70 3" x 10 1/2" medium blue rectangles
70 3" x 10 1/2" dark blue rectangles

The finished twin sized quilt will be 5 blocks wide by 7 blocks long.  (approx. 61" x 86")

~~~~~~~~~~~~~~~~~~~~~~~~~~~~~~~

Cutting list: for Crib or youth bed sized quilt
10 light blue 6 1/4" squares
10 medium blue 6 1/4" squares
10 dark blue 6 1/4" squares
30 3" x 10 1/2" strips of medium blue denim
30 3" x 10 1/2" strips of dark blue denim


The finished crib or youth sized quilt will be  3 blocks x 5 blocks. (approx. 36" x 64")
~~~~~~~~~~~~~~~~~~~~~~~~~

It is possible to cut all of those pieces with scissors, but it is much easier to cut them with a rotary cutter and mat.  Not only is it faster to cut them that way, but the pieces will be more uniform in size which makes it easier to sew your quilt together.


Here are the pieces you will need for one quilt block.
 To sew your first block together, you will first need to cut all of the 6 1/4" squares in half diagionally once.  Each square will be cut into two triangles. Watch that rotary cutter blade... it is super, super sharp!

For your first quilt block, choose two squares of different values, like a light blue and  a medium or dark blue.  As mentioned above, cut each of the two squares in half diagionally once.  Those four triangles will be sewn together to form the center of your square. 

To begin, take two triangles of different colored denim and sew them together along a short side, right sides together, using a 1/4" seam allowance.  Do the same thing with the other two triangles of denim.
Next you will sew the pairs of triangles together.  This will form the center of your block.  To cut down on bulk, it is best to hold the seams so they are going opposite directions when you sew the pairs of triangles right sides together.

 Here is the back of the center of your block, with all four triangles sewn together.
 Next you will be sewing the long strips that form the outer part of each block.  Begin by choosing two pair of strips (two medium blue, two dark blue).  To begin sewing them, you will place the first strip, right sides together, lining up one end with the center square of triangles which you have already  sewn.  Don't worry... the strip is supposed to be longer than the center pieces. 

Begin sewing the side  strip to the center square, but do not sew all the way to the end of the pieces. Stop sewing 2" short of the end of the center square. (see photo above)

Open that side strip out and place the next side strip along the outside of the center square.  It will extend along the whole length of that side.  Sew this strip  on the whole length of that side... it should match up  perfectly.

Using the last two strips sew them on the same way and then you will be able to sew down the final strip which you couldn't fully sew down before.


Ta-Da!  You have finished your first denim quilt block.  Once you have completed the blocks required for each quilt, you can sew them together and form your quilt top! 

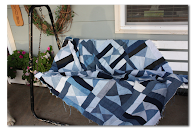
Here's a quilt top that Abbie recently finished.  Should be a fabulous Christmas gift, don't you think?
You have several options for finishing your quilt.  The first time we made these I used cotton quilting fabric for the back and Warm and Natural cotton quilt batting for the interior.  This worked just fine, but it can be a hassle to layer, sew and tie so much fabric.  Plus, the quilts were almost too warm that way!  Now I like to use fleece fabric for the back of the quilt.  Fleece goes on sale so often that I pretty much refuse to pay full price any more!

If you want to use batting and a sheet or cotton fabric for the backing of your quilt you will need to layer like this: first spread your quilt top out, right side up, on top of that place your back, right side down (against the right side of the quilt top), and finally place your batting on top.  Being sure that there are no wrinkles in any of your layers, pin them all together, especially around the edges.  Sew all of the layers together using a 1/4" seam allowance, being careful to catch all of the fabric in your  seams.  Don't sew quite all the way around your quilt.  You will need an opening so you can turn your quilt right-side-out.

If you are going to use fleece for your quilt back all you need to do is layer your quilt top and the fleece right sides together and sew around the edges, leaving an opening for turning right side out. 

Once you have turned your quilt right sides out, you will need to slip-stitch the opening closed.

To finish your quilt and hold all of the layers together, you could quilt the quilt by hand (if you have super-strong hands to quilt through the denim!) or with  a machine.  Or you could tie your quilt.  I usually tie my denim quilts.   I  like to use a nice thick cotton thread to tie with... like DMC Perle cotton thread.  Be sure to tie your knots carefully so they won't come untied after all of your hard work!

There you have it! If you have any questions, feel free to comment below or email me and I'll do my best to clarify.

Wednesday, October 20, 2010

Saturday race report and trip to the zoo!

Thought you might like to see some photos from last Saturday here... we had such a fun day!  At 7:30 that morning, Tom ran in the Kansas City Marathon.  11,000 runners signed up to participate.  It was  inspiring to see so many athletes~ of all shapes and sizes there.
Can you believe that sea of humanity?  It is difficult to tell in this picture, but runners were lined up for blocks and blocks!  I am sure that it took at least 15-20 minutes for everyone to get across the start line once the race began.  Everyone wore a timing chip on their shoe, so the runners in the back didn't have to worry too much about not being near the front.

With so many runners, I was worried that I would miss Tom.  We found him though... here is was at about mile 3... still going strong!
After he passed us there we had some time to kill while Tom ran the rest of his route.  We were able to do a little sight-seeing.  Kansas City has a great downtown area.  We were able to peek in Union Station,

And then we headed over to the finish line to cheer for Tom!  I almost missed seeing him again~ there were so many runners!
Tom did fabulous~ this was his first half-marathon.  He finished in 1 hour 51 minutes!  His goal was to break 2 hours~ he easily did that!  I was so proud of him.  Next up, he plans to run a whole marathon in November.

Once we got home, we decided that one event for the day wasn't enough, so we took the children to the zoo that afternoon.  Going to the zoo is always fun, but this trip was especially delightful as it was the first trip that Timmy could remember taking to the zoo.  He was totally enthralled by each animal and especially by the little train.

The polar bear exhibit is back in Kansas City!  The children all agreed that our great pyreneese Lance looks like he could be this bear's brother.  The pumpkin looks yummy, doesn't it?


 Up tomorrow, Lord willing, part two of the denim quilt tutorial.

I was just reprimanded by the visiting nurse who came to check on me.... too much swelling in my leg~ so she encouraged me to "be good" which means sitting more (sigh...) and using my crutches more (double sigh).  I really don't want to have problems with my hip in the future, so I am going to do my best to be good now.  You heard it here.... I'm going to sit more!  LOL!  (the children are in the background saying "Whatever, Mom!")  ((I really don't do very well sitting....))

Tuesday, October 19, 2010

Thanks for praying...

Just wanted to check in a let everyone know that my surgery on Monday went fine. Thanks so much for your prayers, everyone! I was able to return home from the hospital this afternoon. It is so good to be home... it was way too quiet there in my private hospital room! The surgery to have my hip pinned went well. I'm pretty sore today but I'm sure that I will improve quickly. My sports orthopedic doctor tells me that I should be back riding my bike in 2-3 weeks and running in 6-8 weeks now that the femoral neck stress fracture in my hip is stabilized by three screws. I can hardly wait to get back at it.

I actually tried to post some photos from Tom's race last Saturday, but blogger isn't cooperating right now with my plans to upload photos.  I'll try again tomorrow.  I'm also almost ready to post the denim quilt tutorial too.

Hope everyone is having a fabulous week!

Friday, October 15, 2010

Easiest Denim Quilt Instructions- part 1

I love to make things for my children!  I especially like to make gifts that are practical, easy, inexpensive and not too time-consuming.  These denim quilts fit the bill exactly for me.

Quite a few years ago now, our church had a "Titus 2 ministry" which matched up an "older woman" with a "younger woman" so the older woman could mentor the younger one.  I was so happy to be matched up with Katherine that year.  In addition to encouraging me in my walk with the Lord, she also happily shared practical skills with me.

One of the projects that she shared with me that year was this denim quilt pattern.  As I shared last week, we have made a number of these quilts for our boys~ they are such warm covers.  Our boys love using them and proudly share that the girls and I made the quilts just for them.

Just in time for the weekend, I thought I'd share with you how to get started on this project.

First off, you will need a number of old jeans~ ideally in both light, medium and dark shades.  Of course, the larger the jeans are, the fewer you will need.  You can estimate that you will need 6-10 pair jeans for each twin sized quilt.

The largest squares that you will be cutting for the quilt are 6 1/4", so you will need some pieces that you can cut to 6 1/4"x 6 1/4".  Don't despair if most of your jeans are little.  You will also need some rectangular pieces that are 3" x 10 1/2" long, so even smaller jeans can be used.

Your first order of business will be to cut apart the jeans.  Here is our first victim.
In order to best utilize the pieces, you will want to cut the largest pieces of denim from each pair of jeans that you can. To do that, I cut off the bulky seams, both along the bottom and up the sides of each leg.  It does take a little longer to do this, but when you actually cut the denim into the quilt pieces it will be much easier if you don't have the bulky seams in the way.
 This project will not use the pockets so I usually cut as close to them as I can.  This is what the jeans will look like once you are done cutting the usable fabric off of them.
 And here are the four pieces of fabric from those jeans that I will use for quilt pieces!

Here is a preview of the quilt blocks that you will be making.  (I plan to post the rest of the instructions next week)
Your instructions for this weekend are to cut apart your jeans and sort the denim into piles of light, medium and dark denim.  Then you will be ready to go next week when I post the rest of the quilt directions.

Update:  You can find part 2 of the instructions to make this denim quilt here.  Enjoy!

If you have any questions at all, feel free to email or comment below and I'll clarify my instructions.

Have fun cutting!

Thursday, October 14, 2010

In my Camera Bag...

I occasionally am asked what camera equipment I use, so I thought I'd take a few minutes to fill everyone in.  First off, I just take photos for fun.  I am far from being a professional photographer, so take my advice for what it's worth.  It's free advice and you get what you pay for, know what I mean?

That being said, here's what I have:

  • Canon Digital Rebel xsi.  I believe that I have the 10.1MP version.  There is now a 12.2 MP xsi out.  I'm sure it is a fabulous camera.  This is a great entry-level digital SLR camera.  You can either purchase this camera as just the body (with no lens) or as a kit with the "kit lens."  On the camera that I purchased the kit lens is a 18-55 lens.  It is actually a very versatile lens.


Nikon's entry-level digital camera is also really nice.  I really think you'd be happy with either one.

The more I used this camera, I became aware of my need for additional lenses.  Honestly though, you really don't need a thousand dollar lens~ at least not at the skill level that I am at.  Here are the two additional lenses that I use~ and I do use them both a lot!

  • Canon EF 50mm f/1.8.  This is a "portrait lens" often called the "nifty fifty."  There is no zoom on this lens... your legs are the zoom, but it does take really nice portraits.  Do you like portraits that have the "blurry background?"  You can do that with the kit lens included with the Rebel, but you can really get some fabulous background blur with this lens.  Not necessary, but nice and, as lenses go, not too expensive either.


Last spring as I got ready to go on our trip to Europe I began to shop for a nice zoom lens to use as we traveled.  I read lots and lots of reviews on Amazon and other photography sites and finally decided on this lens.  For the price, it has been fabulous!

  • Canon EF-S 55-250mm f/4-5.6 IS 


  • Finally, you need to make a fabric cover for your camera strap!  Not only is it uber-adorable, but you'll always know right where your camera is.  You can even make one to go with every outfit!

And that's it!  Honestly, for the vast majority of people, it is more about the time you spend taking photographs than it is about your equipment.  I have seen fabulous photos taken with little pocket cameras like a Canon Powershot.  The really critical thing is to be willing to experiment with manual modes and learn to use aperture priority, control shutter speed, etc. I use my camera almost every day... a few days ago I took a walk up in the woods with our boys and was surprised to see 97 photos when I uploaded them.  The more photos I take, the more I learn and the greater chances I have of getting a few good shots.  And hey, digital photos are cheap, right?  How cool is that?

A few years ago I was able to take an online photography class at Jessica Sprague.  It was fabulous for getting me to actually use the manual settings on my camera.  I highly recommend a class like that.  But, that being said, there are many, many free resources to improve your photography skills out there.  I'll try to post a list soon of some of my favorite free resources, ok?

And finally, a few favorite tips to get you started:
  • Turn off the flash!  Really!  Your photos will have much nicer natural lighting that way.  If the room seems too dark, try repositioning your subject or raise the ISO on your camera.  Experiment, experiment, experiment.....
  • Don't just stand to take your photos... the children frequently find my laying on the ground, squatting or even climbing up on things for the best vantage point.
  • The zoom lens can be great for candid shots and capturing "real life" interaction between siblings that wouldn't happen if the children knew that I was photographing them.
  • Don't position your subject right in the center of your lens... off center adds some real energy to the shot.
  • Zoom in on your subjects.  Even part of a face can contain so much more personality than a square-on full face/body shot.
  • Don't just photograph people... take pictures of everyday life. 

There you have it!  Hope that is helpful!


Wednesday, October 13, 2010

Overheard....

Tom and I were getting ready to leave on a little "date night" recently.  "Can I go with you?" one of the younger children questioned plaintively.  "Please?"

10-year-old Joshua replied authoritatively, "Oh!  You don't want to go with mom and dad because they kiss at every stoplight!"  This new revelation caused every child to turn to Tom and I with questioning eyes.  "Is that true Mom?"

Tom and I grinned at each other.... "Absolutely!  Every stoplight.  Every. Single. One."

If you'll excuse me, joyfuldadofmany and I are headed out on a little "date".  We have some smooching to do!


ps~Thanks for your encouraging comments and thoughtful prayers~ I appreciate it!

Mama said there'd be days like this...

Not sure what gives this week... I think I'm nervous about my hip pinning surgery scheduled for this coming Monday (October 18th).  When I am nervous about something (and especially when I can't work off all of the nervous energy by exercising), I tend to begin this vicious cycle of poor choices.  It all starts innocently enough by me staying up too late~ 'cause that's the only time it is somewhat quiet around here, don't 'cha know?  That leads to me being tired (missing my personal time with the Lord in the morning) then sneaking carbs any chance I get  (If I sneak, I don't have to actually share that whole bag of chocolate chips with 10 children!).  Then, when I'm tired and have had too much sugar, I'm not quite as optimistic as usual, if you get my drift.  Subsequently my whole day is thrown off kilter... the challenges of homeschooling the ten children at home now seem insurmountable ("I am such a terrible teacher~ how are the children ever going to survive me" ~ type thoughts dominate my thinking).  I begin to compare myself to my very talented and admirable friends.  Instead of re-grouping and spending time in God's Word, I shop on Amazon and make an impulse purchase (Tom has been working extra lately to help pay for some repairs around here, so I feel guilty about that).  And down, down, down the spiral goes.

Then I remember:
This I recall to my mind, Therefore I have hope. 
The LORD'S lovingkindnesses indeed never cease, For His compassions never fail. 
They are new every morning; Great is Your faithfulness. 
"The LORD is my portion," says my soul, "Therefore I have hope in Him." 
The LORD is good to those who wait for Him, To the person who seeks Him. 
Lamentations 3:21-25

And I begin again to count, to give thanks....  He blesses me in so many ways.  How quickly I forget!
251. an almost-4-year-old's antics....
252. Rain~ finally!  After 14 consecutive dry and cloudless days.
253. Cooler weather with the rain.... aaaah~ relief after several 85 degree days.
254. photo "slide show" on my iPad~ I *love* seeing snippets of our life that way... love it!
255. the warm light of autumn mornings.
256. a husband who works so hard for his family.
257. little boys and rubber bands.
258. His grace which covers all, so richly given!
259. Bread baking in the oven.
260. First cup of hot chocolate this fall~ yummy!

Still up this week... the denim quilt plans and a book review too!

Actually, it might be next week before those are posted, but I do have good intentions!  You might have to be patient, ok?


linking up with Ann at Holy Experience (better late than never, huh?)


holy experience